Making an Applique Wallhanging from Coloring Pages

With my daughter’s room redecoration, she wanted a Hello Kitty picture over her bed. I’m okay with posters, but wanted to make something a little fancier, so I started poking around for Hello Kitty pictures I could adapt to a quilted wallhanging. The good news is that Hello Kitty has very simple lines, and there are a plethora of coloring pictures available.

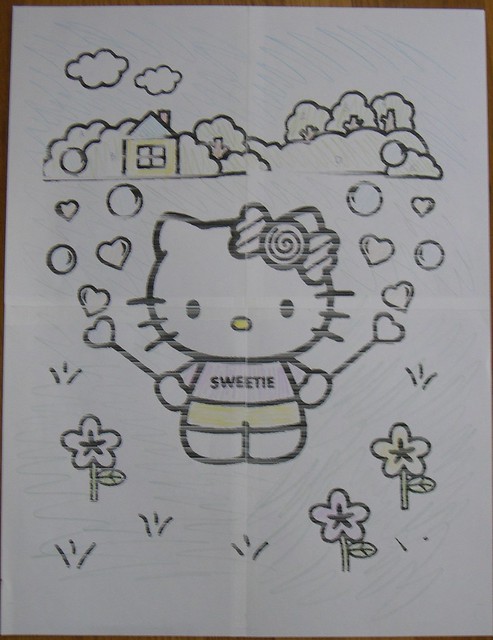
The first thing I did was find a picture I wanted to use. I just Googled “Hello Kitty coloring pages” and scrolled the Google image search until I found one I liked.

A word about copyright: Sanrio owns the Hello Kitty image. Since I am making this for personal use, and will not be selling or seeking to profit from it, I felt it was okay to use this image. If you want to do something similar for yourself to sell, you have to use public domain images.
I do my “graphics” work in Microsoft Powerpoint. It’s not a graphics program, but it does give you the ability to print a single page as a poster; i.e. - it blows the image up from a single page to fit 2 x 2 pages.  And since I’ve used Powerpoint since Moses was an undergrad (as they say at Georgia Tech), it’s relatively easy for me. There are better graphics programs that also have this same enlarge feature, so adjust your work accordingly.
Once I blew up the image and printed it out, I had to tape it together and figure out what colors I want.
Original Drawing
Here is when you can have your assistant of choice help color (such as the child you might be making this for). I chose to do it myself, lightly coloring in with colored pencils so I’d know which fabrics I needed to pull from my stash. Once that’s colored in, I traced all the individual shapes onto a paper backed fusible. Now, tracing the image like this means that when I fuse the pieces on, they will be in a mirror image. Since my image is fairly symmetric, this doesn’t bother me. It’s most important to reverse images when tracing letters.
Here are my chosen fabrics with the cut out, traced pieces of paper backed fusible:
After fusing all the applique pieces to the fabrics, I trimmed them carefully on the outline and sorted them by location, i.e. - all the flower parts went together, all the kitty pieces, and all the bushes/house pieces go together.
I chose to fuse together those groups of pieces into large applique shapes using an applique pressing sheet. You can fuse them onto the background individually, but I feel like doing the groups gives me a little more control.  Here’s I’ve laid out all the kitty pieces onto the sheet after peeling off the paper backs:
The benefit of using a coloring page is that the black lines are really thick and easy to see through the pressing sheet. If you’re lines aren’t that thick, you can use a lightbox, or what I call a “redneck lightbox” (holding it up to the window). Press these pieces to fuse them together, and then peel the whole thing off the pressing sheet.
Once I got all the pieces fused into groups, I then fused them onto the background piece (I pieced together a piece of green for the grass background with a piece of mottled sky blue to make the total background piece). I knew I wanted to use the zig-zag stitch to secure the pieces, and I decided to let that double as part of the quilting so I didn’t stitch any of the pieces down at this point.  The one exception is the bubbles, which I created using a double layer of tulle and an overlay of fusible vinyl. Those I stitched down before sandwiching the quilt.
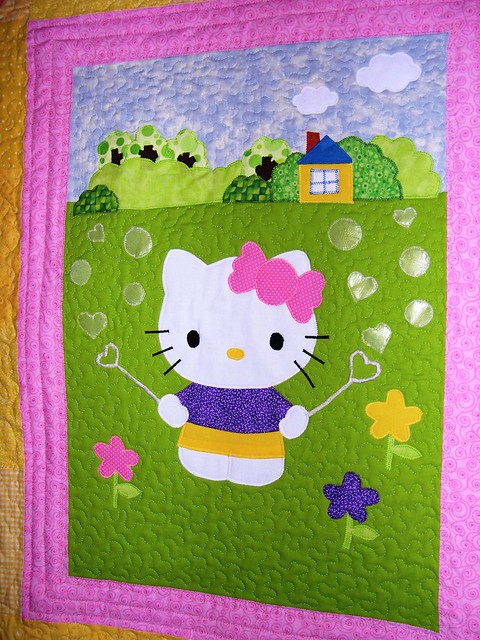
I added a small inner border, and then an outer border of simple squares.  Sandwiched with cotton batting, basted, and voila! I was ready to quilt.  I zig-zagged the outlines of all the applique pieces, and then FMQed the rest.  Here’s a close-up of the center (I used the flash to show the sheen of the bubbles, but that made the rest of it super bright):
Hello Kitty Wallhanging Close-up
And here’s what the whole thing looks like from afar, hanging over my daughter’s bed:

Extreme Room Makeover: Square Edition

If you follow my tweets (and even if you don’t, it’s a good place to see what’s going on with the podcast and you don’t have to sign up for anything just to see them), you’ll know that I spent last weekend redecorating my daughter’s room. Normally I would be sewing up a storm, but it was time for a room update since the periwinkle paint color is one I picked for a guest room before she was born.  She loves all things “cats” (wonder where she gets that from?), so she requested a Hello Kitty room, and that it be painted yellow.

Here’s a before shot (I think she’s 3 years old here, on the throes of a Dora the Explorer phase given the wall stickers and Dora dress):

The bed quilt I made for her once she got that bed, which is a full-sized antique bed we got from my husband’s aunt.  The quilt on the wall is her “baby” quilt, which I finished when she was two.

Here’s what that same shot looks like now, after the re-do:

That bed quilt I bought for $8 at a yard sale. It’s awesome and snuggly.  That’s not a body hiding under the quilt - it’s the (VERY LARGE) collection of stuffed animals she sleeps with now. The wallhanging is one I just finished earlier today, and I’ll be posting a tutorial on how to make an applique wallhanging from a coloring page (and better pictures of it).  Also, for those interested, the bed normally has boring finials on top of the posts, but I found these dragonflies as part of a landscape lighting set and thought they’d be perfect for a little girl’s room.
Here baby quilt is now hanging to the left of the bed:
Here baby quilt has little applique elements from her baby clothes.  I still have plans to do some sort of fun garland to dress up the Ikea LACK shelf over it. 
And here’s the curtains I made for her room (right side of the bed). I couldn’t find Hello Kitty fabric to make the curtains, so I went with just pink cat fabric for the top, and a bright pink with white Swiss dots for the bottom.  The Hello Kitty “dangles” I found in the party section, and they hang from her memo board.
If you turn a little more to the right, here’s the chair I recovered for her (same fabric as the memo board). I also made the Hello Kitty pillow by blowing up a coloring page I found online and using it as a pattern.
And finally, here’s the dresser, showing the baby quilt in reflection. The clock was the thing that started the Hello Kitty mania; it was a birthday present from my in-laws.
You can see that the yellow of the walls appears in varying brightnesses - that’s a hazard of taking pictures on two different days! We’ve got a couple other elements coming in - the garland, a poster, and I have plans for a little embroidery project to hang in there as well - but she’s still happy with it.

Oh hai, Moose!

This is my fused applique project I just finished putting together today (sorry, Jaye - took me less than a week, instead of the two I estimated). I’ll be quilting it tonight and tomorrow, and since it looks like I’ll have it done before Christmas I can give it to them.

This pattern is a Bigfork Bay Cotton Company pattern (Summer Serenity, I think). Pat Sloan just interviewed them on her podcast.

Follow-up! Zapper is unimpressed by mooses, but remains as helpery as ever:

Zapper says: “In your face, moose! And also cancer.”  She’s doing great, and my thanks go out to everyone’s kind words in light of her diagnosis.

Baltimore Halloween Quilt- FINISHED!

Praise Cthulhu! I finished the dang Baltimore Halloween quilt.  I’m going to post the overall picture and a close-up of my favorite block, but to see the rest of the pictures you can click over to the Flickr set (to see additional descriptions) or click thru the slideshow at the end (without descriptions).

Here’s the overall view:

Here’s my favorite block, which I love because of the quilted ghost inside. Before I quilted it, this block was just “okay”. When I took pictures, the sun was behind the quilt, hence the sparkly effect through the quilting):
Here’s the full slide show:

This quilt was originally a BOM but I handled it in one big lump.  I loved the look of Baltimore Album quilts and doing it as a Halloween quilt was the perfect match.

YAY! Think how productive I’ll be now that I’m not working on this anymore! I’ve already finished two small projects since taking the last stitch on this quilt.

Edited: At Tanesha’s suggestion, I’m entering this into the Blogger’s Quilt Festival!

Easter Wallhanging Finished!

Ta da!

Some close-ups of the center and surrounding chicks (I made use of my machines decorative stitches for the green border - I just wasn’t feeling the free motion quilting I started out with)

And here’s a preview of two of my next quilts (in addition to finishing up the Layer Cake Quilt Along quilt):


Even Monkeys Learn

I’ve been keeping busy with lots of sewing as I just got a new sewing machine last month. My other machine works fine for piecing, but was just not cutting it on the free motion quilting- weird tension issues that came and went and it was loud. My new machine, a Janome 6600, is… uh… wow. It’s smooth and quiet and has a 9″ harp. I was good and didn’t go for the 7700 mostly because of cost (it’s $2600 MORE than what I paid for the 6600, which… yeesh). As it was, I’ve sold some fabric from my stash on eBay and some other things, and have plans to sell my serger (new machine has an overlock stitch and handles knits well) to help offset the cost of the new one. But it’s totally worth it.

One of the last things I finished on my old machine before setting it aside (for Bloomer? Or for when I need to travel to a class, more likely) was this mini-quilt for the Atlanta Modern Quilt Guild:

It’s 24″ by 16″ or so, and apparently I impressed everyone with my mad free motion quilting skillz. To which I said, please don’t look at the back which is JACKED UP with crazy tension loops. However, the awesomeness of monkeys make up for it.

One of the other projects I’m working on is a quilt for the Good Mews Animal Foundation auction this year. Zapper is trying to help, but…

She’s a might bigger than the 4 1/2″ square she’s trying to fit into. Her head’s about the right size, though.

The kids are doing… whatever it is they do. Bloomer had a great first month of Pre-K, but things have quickly descended into madness again. I don’t think her teacher believed me when I told her that August appeared to be the calm before the storm. Nothing like being proven right, but as I said below, “Even monkeys learn”. She’ll figure it out.

One day.