Sunday Stash - All the Emojis

GUYS! I quilted my first quilt on Cindy, my Sweet 16.  It was definitely a learning experience, as expected.

  • Learning 1: The lime green thread that doesn’t play well in Jan (the Janome) also doesn’t play well in Cindy. So even though I’ve been holding on to this stupid spool for three years, I’m just going to ditch it because it’s pretty much unusable. I’d love to say I’ll never buy this brand again, but the label fell off so now I can’t even curse it.
  • Learning 2: Rather than puddle the quilt in my lap and quilt front to back, on Cindy, it works better to quilt back to front so the quilting is always moving towards me; with the bigger table, more of the quilt is supported by the table than before. My inclination is also to go right to left so the quilt puddles on the right, which is unfortunate since I installed the extension to my table on the left. Ah well, I’ll get used to it.
  • Learning 3: Rolling up the quilt under the needle and folding it in on itself is not an effective way to keep cats off an in-progress work. In fact, it apparently makes a cozy kitty nest.

Yet still, it was a productive weekend. In addition to the Emoji quilt I finished (to be donated for community service), I also finished my class project sample from my time with Wendy Butler Berns.

The finished quilt is about 13×19″ or so.  The hearts are tacked on, along with the nest and egg, after quilting.  The birds are made with Texture Magic, and the branches are appliqued on in a method I had not done before (and doesn’t use fusible).  Check out Wendy’s Craftsy class to learn more (not an affiliate link, just a helpful pointer)!

  • Used this week: 5.5 yards
    • 1 yd for storage bag for Sparkling Gems
    • 0.75 yd for Textured Tweety quilt
    • 3.25 for Emoji Quilt
  • Used Year to Date: 276.25 yards
  • Added this week: 0 yard
    • Woohoo!
  • Net Used YTD: 164.5 yards
  • YTD Used for Charity: 104.75 yards (38% of total used)

See more stash reports at Patchwork Times!
Sunday Stash: Such Yardage, Very Quilt

This week I finished up the other two Sew Together bags,  my Harry Potter block, and a small quilt at my daughter’s request.

First, the Harry Potter block.  I went with Harry’s wand in a wood grain fabric.  I forgot to check the sizing when I printed, so my block came out 3/8″ too small and required some spacer background pieces to bring it to the right size. Alas! Fortunately this is a fairly forgiving block for this sizing issue, so it wasn’t too bad.

My daughter’s “doge” quilt is based on an internet meme that started with a captioned photo of a Shiba Inu using the Comic Sans font. It is her current obsession, and she desperately wants to go to Japan as a result. I’ve tried telling her that you don’t see Shibe’s frolicking in a field right when you get off the plane in Tokyo, but she is so far undeterred.  She’ll have to settle for her doge quilt in the mean time.

I found a vector art file of the doge face and traced the big chunks onto paper backed fusible, using 5 different fabrics for the face. She specifically wanted the face on 4 squares, so I stuck to simple piecing and quilting and finished this in a day (but didn’t tell her it was done until after I showed it at my guild meeting this morning!).

  • Used this Week: 3.25 yards
    • 2.5 yd for  2 Sew Together bags
    • 0.75 yd for Doge mini quilt
  • Used year to Date: 95 yards
  • Added this Week: 0 yards
    • Woohoo!
  • Net Used for 2015: 35.75 yards
  • YTD Used for Charity: 55.25 yards (58% of total used)

See more Stash Reports at Patchwork Times!

WIP Whoopsday: A Tiny Vacation

Oh, not a vacation for me, that is.  I made a tiny beach scene this week as a gift for a friend:

It measures about 5×7″, and is quilted onto Peltex and backed with flannel.  I used diced up batik scraps for the sand and ocean with a tulle overlay.  There’s a very small orchid on the beach as well to go with a scented oil reed diffuser I also gave her, named “Salt Water Orchid“. It smells delightful and I have one at my desk too.

I also got the center of my One Block Wonder all sewn together - here’s a picture of it two-thirds done.

I feel like I should leave the sides intact rather than cut them off before adding the border, but I’m not quite sure.  Of course, I also need a border fabric. Sigh.

And, big news, the East Cobb Quilters Guild extended their deadline for quilt submissions, so I have an opportunity to submit a couple other quilts! I’m thinking of entering the Grand Illusion Mod Baby Quilt (even through I machine stitched the binding- alas!) and maybe my Psychedelic Pots mini that needs quilting.

WIP Wednesday: Fabric Postcards

I’ve been working on fabric postcards to sell at the Good Mews Holiday Market in December (all proceeds from sale of my items will benefit the shelter), so I thought I’d post a couple of them in progress.

These are all just about ready to attach to the cardstock so they can be mailed.

The first set is from a panel I bought at the AQS Chattanooga show that features some “rescue” messages with pictures of cats. I added bits of ribbon or felt to jazz them up. I’m afraid, however, that the grumpy grey tabby in the lower right is going to stay grumpy despite any amount of ribbon being added.

My next set is based on a panel I got two years ago and used in a tablerunner for my aunt, and these gave me a chance to use some of the fancy stitches on my machine.

I’ve got around 20 or so based on various panels that are ready to be finished up and attached to cardstock, then I’ll take a break and work on a bigger quilt, and then go back to postcards. Any of these that don’t sell at the shelter event will get donated to the East Cobb Quilter’s Guild show next June.


Painting for Illusion with Esterita Austin

I had the privilege of taking a class from Esterita Austin today through the East Cobb Quilters Guild on “Painting for Illusion”;  I wanted to take it because my art quilting skills could use a little improvement; wait, that’s a lie. They could actually use a LOT of improvement, and I’ve always wanted to paint better.

Esterita is an excellent teacher and I would definitely recommend taking a class from her if you get the chance; she is entertaining and charming and very knowledgeable about techniques and theory behind design and painting on fabric. Also, she invented MistyFuse, so she’s smart, too.

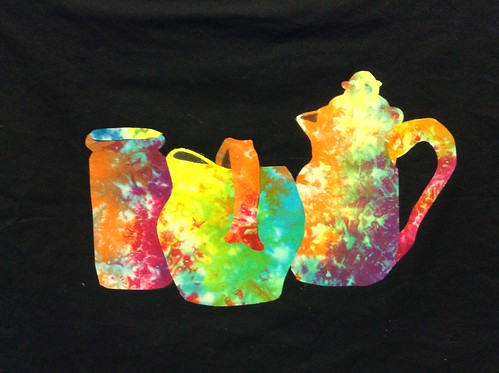
Anywho, our class project was a still life of three pots, which were fussy cut from her hand dyed fabric.  The goal was to have light value on the left and dark value on the right to mimic a light source somewhere on the left.  Here’s a picture of my piece after fusing, but before painting:

UntitledWe then worked on painting using some ProChem paints Esterita provided and learned about blending, tints, shading, and all sorts of Fancy stuff. And voila!


I’m happiest with the pot in the middle - the leftmost one is still a little jacked up.  On the rightmost one with the handle, I’m happy with the painting I did on the lid to give it definition.  Esterita was impressed the skinny dark line was done with paint and not a Sharpie marker.  A+ for skinny line drawing!

I’m done with the painting, but I’m not sure if I’ll quilt it.  The colors are not something I’d normally decorate with, but if I do quilt it, it would be with some sort of humorous background to depict the psychedelic nature of the color palette of the pots. And possibly play off the word “pot”, if you catch my meeting.

The Grumpy Goldfish - Finished!

I’m throwing together a collection of my quilts to show tomorrow at the Artists’ Career Day at my kids’ school.  I think I’m the only quilter, and although I don’t do it professionally (although have taken commissions here and there), I’m happy to talk about it and the joy of making something with your own two hands.

A lot of my quilts are blanket-type things to be used on beds or to cuddle with on the couch, but I wanted to up the representation of more art-y type quilts.  I had been eying this painting my daughter did in her first art class a couple months ago (she does art in school, but we added an extra one outside of school because she enjoys it, and doesn’t do any sports like her brother).

I have a lot of respect for a fish that can maintain that level of anger while swimming in a peaceful ocean amongst the kelp fronds. That’s a real commitment to an emotion. So I did my own take on it as a small art quilt:

I used a piece of blue batik for the base, and fused a piece of fusible interfacing on top of it. I then sprinkled small snippets of various blue batiks to give a little more texture to the water.  The fronds and fish are backed are fusible applique pieces as well, and the entire piece is covered with a single layer of tulle to hold it together while stitching.

You can see the tulle at this angle a little better.  Some of the stitching on the fish and plants was done only on the background as thread painting, but I did additional stitching after adding a layer of batting and muslin backing for more dimension.  The center stems of the fronds are actually on top of the tulle.

I threw in some Angelina fibers for good measure as I thought the grumpy fish needed a little more flash.

My ultimate goal is to get the original painting and the quilt mounted next to each other, but I’m not quite sure how to do that yet. In the mean time, I’m going to enjoy his commitment to anger at my desk!

On Delightful Quilting

Remember when Sandy did her quilty resolutions contest, and I said I wanted my driving word to be “delight“?  This week has been a wonderful example of making progress on using that word.

I had high hopes for the landscape quilting class I took a couple weeks ago.  It uses a “fabric confetti” technique to create a landscape.  Because we didn’t have sewing machines in the class, the instructor provided us the background fabric with Steam a Seam attached to it, and then we placed our trees and confetti leaves on it, added another adhesive (the Bo Nash sprinkle kind), and then a layer of tulle and then pressed the heck out of it to seal in all those little pieces.  Here’s what mine looked like when I left the class.

After reconsidering, I carefully pulled back the tulle and added more leaves in some different greens from my stash at the top of the piece, and a little more ground cover at the bottom. I sandwiched it with my standard 80/20 and a piece of muslin for the backing, and started thread painting this weekend.

To my disappointment, the amount of adhesive on here gums up my needle after 3 stitches.  I was getting skipped stitches left and right while trying to accent the tree trunks, and it only worsened when I tried to do the leaves.  I had started using my monofilament, and then a 12 weight variegated Sulky thread (both with a size 90 needle and a top stitch needle), and when those combinations failed, I went to a shade of brown in my trusty Aurifil. Even with 3 different needles (universal size 90, topstitch, and size 90 embroidery needle) and the 50 weight thread, the stitches were still skipping and looking horrible.  I was stopping to wipe the needle down with a cotton ball soaked in alcohol every 5 minutes or so and it’s just a miserable process.

I have heard of a product called “Sewer’s Aid” that’s a silicone based lubricate of sorts you put on your needle to help keep the adhesive from gumming it up. I might try that if I can find it, but otherwise, I’m trashing this project. It’s just not delighting me.

I will try the technique again, but only here at home where I don’t have to secure everything with so adhesive to transport it.  I think I might try a smaller forest scene since I still have lots of the different green confetti left, and some browns for tree trunks.

Since that was such a disappointment, I was very happy to work on this fun piece (after finishing my Easy Street quilt - holla!).  It’s inspired by a love of RuPaul’s Drag Race that I share with some of my guildmates, as we discovered at our sew-in last week.

It measures about 7×10″.  The words are threadpainted/FMQ’ed onto Kona White backed with a piece of Peltex instead of batting so it would be stiff enough to stand up on it’s own.  I used my watercolor pencils to fill in the letters, and a decorative stitch to border it.

This delights the heck out of me.

Namaste Mini - Finished!

I wanted to make a little gift for a friend in guild who always seem to make everyone feel better by her mere presence, and this was a perfect excuse to play around with my new watercolor pencils (I used them a bit on the beach scene I did for my niece, but wanted to really play).

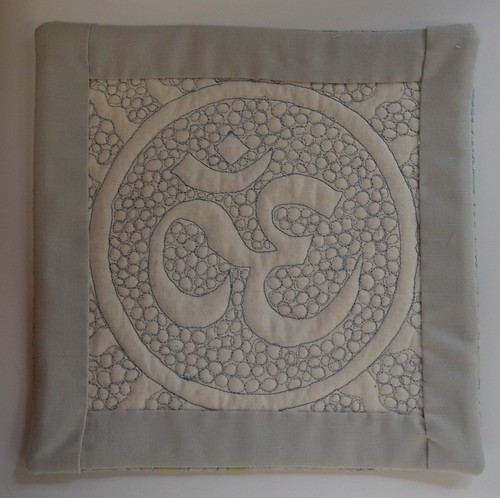
This Om symbol represents the known and unknown forms of God, and is a nice focus point for the design and intended recipient.

I started by stitching a little design on a 9×9″ sandwich, which I traced using a lightbox.

Next I colored! You can see in the picture below the stroke marks from the pencils, and how it’s a little choppy on the transition.

I used a stiff bristled brush dipped in some aloe gel, available at the natural market near my house, to blend the colors. See how much brighter they are now?

(Now, you might be thinking that with all this yoga and natural market talk in this post that I don’t eat Ben & Jerry’s ice cream on the couch watching CSI, but I assure you, that’s where my yoga pants are at their best.)

Then you can go a little crazy on the free motion quilting. And decide that, whoops, you need a bit more color.

9″ square inches worth of pebbling is about all I can stand, so this worked out perfectly! Square it up, and it’s time for more ice cream.

I finished the edges with a facing so a binding wouldn’t distract from the front design.

Namaste Mini QuiltEt voila! A finished little mini-quilt.