Paparazetti Baby Quilt - Finished!

I finished this baby quilt a couple days ago, but between rain and Christmas, I’m just now getting the pictures posted.  I’m going to star the post with a picture of the “Mama” quilt this was inspired by, the Paparazzi quilt designed by my friend Chris (pattern for sale here!).

Paparazzi Quilt

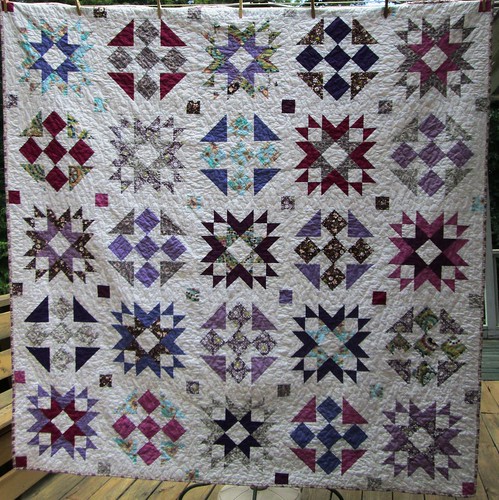
I gave Paparazzi to one of my husband’s cousins (or 2nd cousin - families are hard!) for a wedding gift.  Lo and behold, they announced a pregnancy shortly thereafter, so I knew that all those “waste” triangles from making Paparazzi would come in handy in a baby quilt for the same couple.  So I present the Paparazetti baby quilt:

I threw a little more teal into the baby version than the original to tweak the color scheme just a bit.  We know it’s a baby girl, so the colors worked out well.

Each block measures 6″ finished, so my waste triangles were some weird size unfinished since it’s a 4×4 block layout.  Depending on the fabric placement, some blocks looks like spinwheels, and some look like throwing stars.  What a super cozy theme for a baby quilt: dizziness and death.  Hmm.  At least the colors are pretty!

Once I can stomach going back to the post office after the holiday season, I’ll get it shipped off to the expectant couple.

WIP Wednesday: Paparazetti

I am feeling a bit scattered this week, for good reasons that are not at all related to quilting.  There is good news for work (received today after much ANGRY CAPS LOCK repressed emails earlier in the week), and good news for my daughter at school, and two and a half weeks of vacation coming up for me & kids. Huzzah.

So while I’m working on Celtic Solstice and Scrapitude and my Tula Pink EPP project and the units for my parents’ quilt, I’m throwing together a baby quilt, too.  I’m calling it Paparazetti right now as it’s made from the waste HSTs of my Paparazzi quilt.

This is the center, and it will have a 2″ border of Snow and a teal border added to it to bring it to a decent size.  I should be able to finish up those borders at my sew-in tomorrow night and get it sandwiched and quilted this weekend, I think.

Special guest appearance by the cowboy boots I got in college, and have started wearing regularly in the past couple months. They remind me to kick some butt.

WIP Wednesday: Helpering in a Box

For those of you with helper animals, cats in particular, you will understand the allure of an open box.  At least they were not on the blocks, I suppose. Or “on the blocks anymore” I should say.

Ahem. So yes, I’m working on my Star Surround surrounds and had to lay out all the blocks to figure out which fabrics went where for each block and I’m about half done with the surround parts. I might be able to finish those up tonight.

I’ve also got the top finished for Silver Star.  Here it is with two of the three borders put on.  The third border is another aqua one, which is a tiny toy mouse print to kick up the cute factor since it’s being auctioned off to benefit Good Mews Animal Foundation, the cat shelter I volunteer for.

The HST border is made out of waste triangles from the center blocks. I used 168 of them, out of 502, which means I have just shy of a bajillion left for another project.

WIP Wednesday at Freshly Pieced

Sunday Stash: Stealth Mode

I feel like I’ve gotten quite a bit done, but haven’t finished anything this week. Ah well, I guess even Superman took some time out to be mortal, too. After he made 240 flying geese.

We had our day retreat for the Atlanta Modern Quilt Guild this weekend, and while I lost an hour looking for my sewing machine power cord (which appeared on the floor under my sewing machine ultimately) and taking care of lunches and dinners and the like, I did manage to get 200 of the units done for the Silver Star quilt.  Since I sewed an extra seam on each corner triangle, I ended up with 400 bonus triangles, too.  I’ve got 52 more units to make, and then I’ll piece those into blocks like the layout here, and use the bonus triangles for a border in the quilt.

I also started on the cornerstones for the Tiny Stitches Royal Garden Saturday Sampler quilt, also making bonus triangles from the square in a square blocks since I want to try to upsize the quilt from queen to king. We’ll see if I’m able to make that work with the fabric I have!  I also got all the sashing and one of the borders cut from the same finishing kit.

  • Used this Week: .75 yards
    • 0.75 yd for 3 FQs lost in the LCR dice game. Oh well, hope springs eternal!
  • Used year to Date: 260.25 yards
  • Added this Week: 9 yards
    • 9 yd for secret project to be revealed in November.
  • Net Used for 2013: 126.5 yards
  • YTD Used for Charity: 113.75 yards (44% of total used)

See more stash reports at Patchwork Times!

It’s the Little Things

I don’t tend to offer commentary on current events or news stories, in part because I like the blog to remain “timeless” in that it centered on my (sewing) life, and also because I have other ways to express pain/disgust/despair/whatever that don’t necessitate me spewing my opinions all over the internet. Mostly because everyone has their own opinions, and they may not match. And you know what they say about opinions.

So, having said that, the “little things” are bringing me joy. And here’s some little things I just finished.

This is my Terrain buffalo bits mat. When I put this on my Q4 finish-along goals, I had thought I had way more of these HSTs to put together. As it turns out I had many more from the Snowbunny quilt than I did from Leaf Me Alone, but I did get this little mat put together, which measures 16×16″.  Since I already have a Terrain tabletopper from the twister tool, this one is going into a Christmas gift for the sibling exchange for my husband’s family.

And speaking of the twister tool, I used one and a half charm packs from Sweetwater - Reunion, and one from two years ago that I can’t remember the name of - to make this little twister quilt that will go on top of the cedar chest on our bedroom (it measures 38×28″). The twister tool gives a lot of bumpy seam intersections, and with the added meander quilting, there’s lots of texture for the cats to enjoy (the chest is next to a window they like to look out, and this is replacing some sad fleece blankets that were on top of the trunk).  The lighting is horrible, but I figure that’s the sort of quality you’ve come to expect from Poorly Lit Quilterpiece Theatre!

And finally yesterday I whipped up the components for Easy Street Step 4. Apparently some people are not fond of flying geese. Hmpf.  There were “only” 64 of them, so it wasn’t that bad.

Check out Bonnie’s linky to see the other Easy Street participants!


WIP Wednesday: My Brain Wins Again

Apparently my brain feels it’s not indulged enough because it made me make these two tabletoppers yesterday evening and today at lunch. I meant to use the buffalo bits from my Kate Spain Terrain fabric, which is on my 4Q Finish Along Goals, but these ones from the Snowbunny quilt jumped up instead.  Those HSTs finish at 1 1/4″, so the smaller one is 8 3/4″x10″, and the larger one is 26″ x 15″. I think the smaller one is going into a white elephant gift exchange for work on Friday, but I’m keeping the bigger one.

Once I got over my brain, or just learned to tune it out, I started putting together the twister charm quilt for my cedar chest.  I’ve got the center put together, and just need to attach the borders and then cut out the twisty bits.

I also sketched out my daughter’s Christmas quilt (for next year), so I can cut out existing fabric for it, and get a feel for what I might need when Christmas fabric sales start happening this year.

After the twister quilt, I’ll work on the second Weekender bag, I think.

Festive Flurries - Finished!

I’ve been on a roll this week. 🙂 I finished the twin-size “winter quilt” for my son’s bed, Festive Flurries:

The center blocks were designed by Jocelyn Yeung of It’s Sew Emma from American Patchwork & Quilting.  Their original layout calls for another row of snowflakes and would have made it closer to full size, a bit too big for my son’s bed, so I adapted and added the row of HSTs. In piecing the snowflakes, I generated 112 2-1/4″ finished size HSTs, from which I took 64 for those border corners (I used the rest in a scarf for a friend).

I had fun quilting icicles into the light parts of the HSTs.  The rest of the quilt is done primarily with a meander.  The back and outer borders are a cozy flannel.

Nina approves of cozy flannel quilt backs.

Frankenbatting

Since I buy my batting by the roll (usually in 25-30 yard lengths of 90″ wide), I end up with various odd sizes of batting leftover from projects that aren’t quite that big. And I’m also stubborn (and lazy) enough that I don’t want to pull out the gianormous roll of batting to cut off just a little bit for a small project like a wallhanging or tablerunner. Enter the Frankenbatting.

In my cutting table, one of the big drawers is reserved for batting scraps. It might be long skinny pieces leftover from trimming a quilt after it’s quilted, odd rectangles, or pieces big enough for a baby quilt. At one point they were folded nicely, but I believe now I am living by the “shove and pray” method of storing my batting scraps.

When the time comes for a small project to be quilted, I’ll paw around in the scraps until I find pieces that fit together to make the size I need.  For this example, I was piecing together scraps to quilt one of the recent tabletoppers, which is a rough octagon (think of a rectangle with the corners cut off, like all the paper in Battlestar Galactica). I butt the pieces of batting together for the layout - not overlapping, but edges touching.

I made some hashmarks with a Frixon pen. Since the quilt top and back is dark colored, the marks could have stayed on the batting, but I like that they’ll disappear with heat with that pen. Those blue arrows point to my hashmarks, and I make them about every 6 inches on both pieces of batting. This gives you a way to make sure you won’t have one piece of batting feeding faster than the other when you join them, ending up with a wavy humpy piece of batting for your quilt. You can imagine how I discovered that could happen.
To join the pieces together, I used the biggest, widest zig zag stitch on my machine. This is also an excellent opportunity to use the ugly thread that doesn’t match anything in your stash since this thread won’t be seen inside the quilt.  Once you get all your pieces marked and zig-zagged, voila! Frankenbatting.

Mid-week Progress: Blocks and Such

I did do my Saturday Sampler block pick-up on Saturday, but what with the party and general weekend shenanigans, I didn’t get to them until last night.  As a result, the lighting is crappy because I took the photos as night.

Here’s the latest Memories of Provence, which has about a million pieces:

By contrast, here’s the latest Going Coastal block, which is considerably simpler:
And then this morning I snuck in some early morning sewing before work and my daughter woke up and whipped up this little baby changing mat from the scraps of Pinwheels and Patchwork baby quilt. I laminated the top with some iron-on vinyl (in case you hadn’t heard, babies can generate a lot of… stuff, and easy clean up is essential) and bound it like a regular quilt. The quilting is about 5 lines of straight line quilting, just enough to hold the layers together.
The finished mat is 16 x 24ish, and will go into the basket of goodies for the new mom along with the quilt!