

Kitchen Mini-Makeover
While I love our house, there is no closet to store a vacuum cleaner. This occasionally troubles me, and is not particularly germain to this effort other than to explain why the vacuum cleaner is featured prominently in the “Before” picture of this area of my kitchen.
This is a weird corner that should be a pantry, except there’s already another one just opposite this shot. Or maybe the wall on the right should be knocked down and the coat closet that just to the right expanded in footprint, except there’s a GFI outlet in the wall we’d be knocking down and a floor vent behind where that bookshelf is. I don’t know what the architect was thinking with the vent - it’s in the WORST place so any piece of furniture blocks it.
Anywho, what you also can’t see is the cubby system I had built for the kids just below the chair railing to off screen to the right of the photo above. Except we built it when they were both about a foot or two shorter, and it’s in the way of foot traffic into the kitchen.
So here’s what this area looks like now, post renovation.
The bench I bought through Overstock.com, and the two drawers act as the kids’ “junk drawers”, one for each. This is for swim goggles, tidbits, party favors, and various the flotsam of childhood. The top of the bench is now where backpacks and my purse sit when not in use (if on the floor they block the stupid floor vent!). Please note my new purse matches the new kitchen wall paint. A post on that purse coming soon!
The two wall shelves I built and painted using a circular saw, Kreg Jig and a cordless screwdriver. In theory there’s now a double hook for everyone for various jackets that we’re too lazy to go around the corner and hang up in the coat closet like actual people and not the uncultured, jacket-wearing, heathens that we are. Also, Fred’s leash now has an official spot other than “on top of my purse”.
The bins on top hold various things - one holds all the sunscreen, one holds all of Fred’s accessories as he didn’t rate a junk drawer of his own, one for the kids’ hats/gloves/etc, and one for fabric grocery bags and spare wallets or purses. I’m still contemplating making some decorative sleeves for the bins (which were $5.25 a piece at Target) to jazz them up a bit. I have enough purse fabric to further coordinate, but that might be pushing it!
I’m very happy with how it turned out, and even happier that it’s just DONE. I’ve been thinking about this stupid corner since we moved in 10 years ago!
But I still don’t have a good place to put the vacuum cleaner.
Refinished Kitchen Hutch - Finished!
Several years ago I got it in my head that I wanted a hutch for my kitchen. The catch was it had to be small enough to fit on this one particular wall next to the bathroom door, so I spent a couple weeks trolling Craigslist for something that would suit my needs, and that I could refinish if needed.
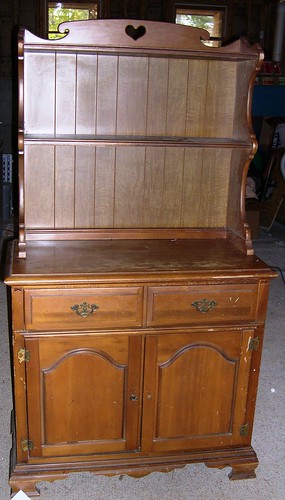 I found this lovely example of 80’s Country Chic for $25. Surely much dusty-rose colored flowers adorned this at one time, but I don’t really “do” hearts on furniture. And there were hearts EVERYWHERE. That thing on top, etched into the hardware…. bleh.
But it had the characteristics I wanted - lots of storage underneath, some decorative shelves up top, and a drawer that would become my husband’s “junk drawer” so he wouldn’t spread his wallet, chapstick, loose change, phone, receipts, nail clippers, and papers all over the kitchen island.
And it was only $25!
The previous owner was very apologetic about the scratches and wear on it - I told her not to worry since I was going to refinish it.
For those that have never refinished furniture before, you need sander/sandpaper/sanding blocks, patience, some basic tools, and a dust mask. I removed that top piece with the heart on it, and took off all the hardware and stuck it in a baggie. That meant I had 5 pieces to refinish - the base, the hutch, 2 doors and a drawer.
I used an electric sander to take off the existing finish (wearing a dust mask), and then I spray painted the pieces with a flat white paint. I wanted it to look hand-rubbed and not glossy when done, which apparently I didn’t communicate to husband well because he stepped in a spray painted it for me with HIGH GLOSS white. So I had to re-sand it. And then spray paint it with flat white. After I did my edge finish technique (more on that in a bit), I coated the whole thing with 3 coats of matte clear coat to protect the wood. I got new hardware for the drawer and door knobs (keeping the old hinges because those are insane to try to replace with a different type). And voila!
The total cost for this, after the $25 to buy it, and hardware and spray paint and clear coat, was maybe $50 total. We had all the tools already, so it was definitely worth it to get a piece of furniture I’m happy with, even if it took me a couple years to finish the dang thing. Apparently I got distracted by making quilts? And now that it’s done, my husband can once again park in the garage again.
I like the look of the pre-worn edges on furniture, especially when they are going to be in a high traffic area like a kitchen. To get this look, after you get all your base coat of paint on the way you want, you take a sanding sponge and rub the edges where wear would naturally occur. Then I used a stain marker (in cherry), and colored in the edges a tad darker than natural color, wiping off any extra stain before it dried on the white paint. I got the idea from this tutorial from Ana-White.com, which is great for DIY woodworking projects.
The added bonus of this finish is that when you are hauling this up the basement stairs by yourself (with the help of your seven year old daughter, of course) because your husband is still recovering from shoulder surgery, you can bang the crap out of it against the stairs all you like and it only adds to the natural wear.
I haven’t quite worked out exactly what I want to keep in the bottom yet, but I’m sure it will fill up by the end of the week. The junk drawer is already getting full!
Naturally, I need to make a runner for the top, and for the triple mini quilt frame you can see on the middle shelf in the picture of the entire hutch. In fact, I probably need to make multiples so I can switch them out!
Shelves of Doom: FINALLY
I’m sure everyone remembers waaay back in March when I blogged about how Brief had nearly chopped off a finger (or two) using the Table Saw of the Damned to make some adjustments to the shelves I had started while he was out of town earlier in the year. His fingers are fine now, aside from having not very much feeling in the middle one where it got mangled.
And then the summer dragged on and neither one of us was going to get near the TSotD, and then he finally got some thick gloves and finished up the last little bit. Then we had to jimmy the shelves in place and paint them and whatnot, and so now, here it is 9 months later and they are done! Hooray!
Sorry about the weird flash effect here - the lower walls are actually a brick red and not pink. The shelves fit under the part of the kitchen counter that juts out into the breakfast area (you can see part of the chair on the very left of the picture above). There’s a couple pieces of masking tape to come off of the end there, but that’s going to require a razor to extract.
I used a Deka curtain wire from Ikea for the curtains to hide the less glamorous looking sewing accessories like my serger, magazines, and other baskets and tidbits. Right now the kids are enjoying having their games in a new place, although they used to be on shelves right next to where these are now, but New and Exciting is always better apparently. The metal containers on the top shelf house Play-Doh and paint supplies so at least we can hear if they try to get them out and make a mess.
It’s good to have them done. They’re not perfect, but then, nothing is. I look forward to getting an extra cabinet from my parents over Christmas to put the rest of my sewing stuff up in so it’s not out all over the place anymore.