Every year for my kids’ elementary school Fall Festival, there is a pumpkin auction. Each class suckers a parent in solicits a volunteer to make a pumpkin, and the money goes to fund various things like playground equipment or books or computer programs. Because I am crafty, and also competitive, and also because it gets me out of working a shift at whatever game the class is responsible for running at the festival, I volunteer to do the pumpkin for each of my kids’ classes.
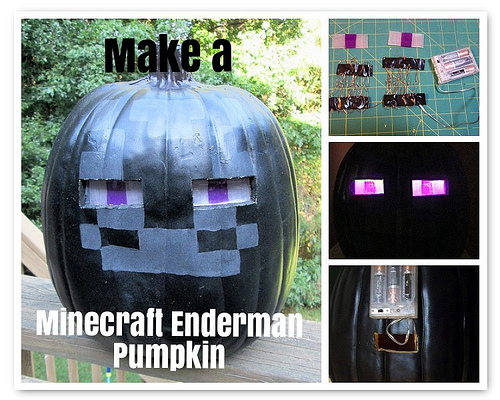
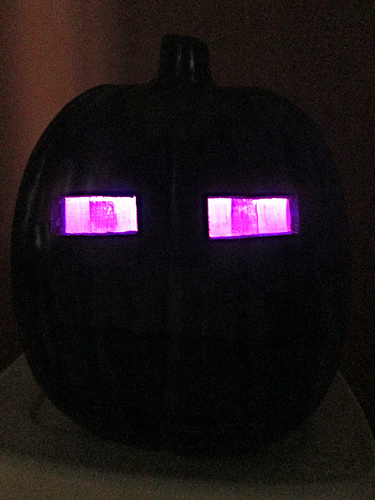
To me, a decorated pumpkin isn’t really Halloween or fall-worthy unless it lights up. Last year, I did a Minecraft Creeper pumpkin and a Minion pumpkin. This year, I’m re-visiting Minecraft with an Enderman pumpkin (and pumpkin yet to be revealed!). Here’s a little detail on how I did it.
 Materials:
- One big old fake carveable pumpkin
- String of battery powered LED lights - I used purple. Please use LED rather than traditional lights because LED lights don’t heat up and cause a fire hazard!
- Black electrical tape
- Black and white paint to make grey, or just use grey
- Clear shrink film
- Fine grit sandpaper (350 grit or higher)
- Pink and purple colored pencils
- Carving utensil
- Clear gloss spray (optional)
- Thumbtacks
Transparency statement - If you click the links above I get a little cred from Amazon. The links I’m providing are the actual products I used, so I do recommend them!
 Step 1. Paint your pumpkin black. I lucked out and got a black pumpkin so I could skip this step. I then cut out two holes for the eyes. According to the graphics I found, the eyes had a 1:3 ratio, so I made two holes 1″ x 3″, about 2″ apart. After the eyes were carved out, I used the graphics reference to freehand the grey markings for the face. You could be official and tape off for super straight lines, but pumpkins are curved, so I just winged it. I did two coats of grey paint for the face, and also used black paint to darken the carved areas around the eyes.
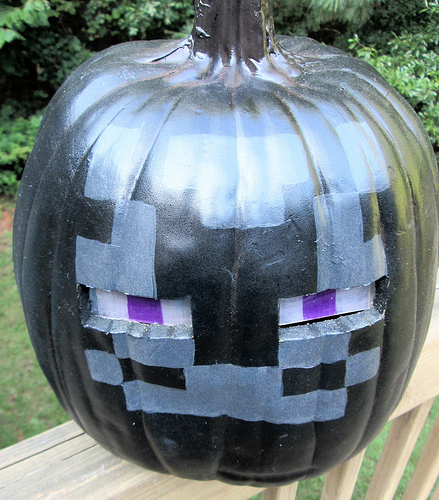
Step 1a (optional). After the grey paint was dry, I sprayed my pumpkin with two coats of glossy clear spray to seal in the paint. The original pumpkin was glossy and my grey paint was flat, so the clear coat evened out finish.
Step 2. Cut out two pieces of shrink film that measure around 7″ x 3.5″. Sand one side lightly with a fine grit sandpaper. Mark them into equal thirds with a light pink colored pencil, and color the middle section a purple, and the outside thirds in a pink or light purple. Shrink them according to manufacturer instructions in the oven. 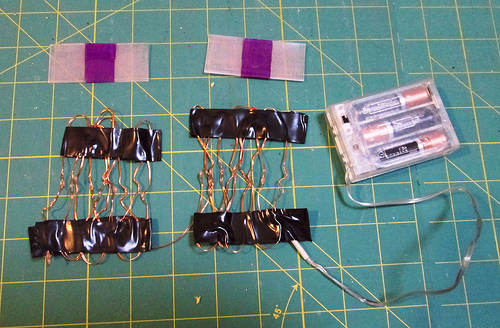 They should end up measuring somewhere around 1.5″x 3.5″ with a more intense color (see picture).
Step 3. Take your string of 20 LED lights and organize them into two groups of 10 lights, about 3″ across. Use the electrical tape to secure them in that arrangement, as in picture above. Take a minute to turn the lights on and off to annoy your children while they are trying to play Minecraft.
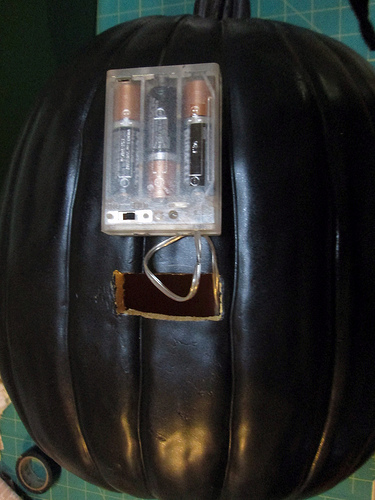 Step 4. On the back of the pumpkin, carve a hole the exact size of the battery pack. You’ll have to feed the grouped lights and the battery pack through that hole. Don’t push the battery pack all the way through! You want the pack to fit snuggly so it won’t fall out, but you need to be able to reach the switch to turn the lights on and off.
While you’re wielding the knife, cut a hole out of the bottom of the pumpkin large enough to fit your hand inside.
Step 5. Back the very edges of the eye pieces with electrical tape. The tape should cover about 1/8″ to 3/16″ on the edge of the pieces, and extend at least an inch on either side of the plastic. Slide the taped, plastic eye piece in place through the big hole in the bottom you just cut so they are centered behind one of the eyeholes. The tape will temporarily hold it in place, but it doesn’t stick well to the inside of the pumpkin. Use a thumbtack in each corner of the tape to hold it in place. Do the same for the other eye.
Step 6. Use more thumbtacks to secure the LED groupings to the back of the pumpkin, about the same level as the eyeholes. The thumbtacks will go through the electrical tape holding the groupings together.
 Step 7. Put the piece you cut out of the bottom of the pumpkin back in place and secure it with the electrical tape.
Admire your handywork and annoy your children further by making them go in a dark room with you while you turn the lights on and off!
 And on top of the sewing, it’s Competitive Pumpkin season at school again! This year my daughter requested a Doge pumpkin. I shot that down.