Category Archives: State of the Sewing Room

Happy Podcastiversary!

Three years. THREE years today. Holy crap.  Here it is by the numbers:

  • Number of podcasts: 150. This over a three-day weekend’s worth if you listened to them all the way through.
  • Number of quilts and sewing projects: Over 150. Based on my Pinterest boards, it’s 149, but I know there were things in 2010 I finished that didn’t make it on Pinterest.
  • Number of hours of me crying on the podcast: Probably an hour if you string those moments together. Sorry about that.
  • Yards of fabric used since Jan 2012: 897. Holy moly.
  • Pounds of me lost: 37.
  • Number of times I’ve said “So there’s that.”: No idea. How drunk are you by now?

Typical quilt of mine from 2010 versus 2013:


Thanks for sticking with me, guys. The next 150 are going to be epic.

Q3 Finish Along Wrap Up

Well, I made all my original goals, but fell short a bit on the one project I added on right at the end. I’m pretty sure I won’t finish it by the end of day today it’s just going to have to wait until Q4 to be done. Oh well - I’m still happy with my progress!

  • Dresden Plates Quilt – Plan developed, plates assembled, background being pieced. An excellent candidate for my Q4 FAL goals.

WIP Wednesday: Quilting Sand Is For the Birds

Well, I’m sort of stuck with Beachwalk quilting.  I’ve “finished” quilting 4 out of 9 blocks, but reserve the right to go back and quilt in some areas if it looks uneven when the center is done.  I’d love to take a break and piece something, but I have the superstition that if I move my machine back into piecing mode from quilting- with- monofilament- mode (change the bobbin case, adjust stitch length, change the needle, etc.), catastrophe will happen. So I suppose I’ll power through, and maybe set up my Featherweight if I really need to piece something?

Here’s what I need to be piecing to stay on top of the Star Surround quilt along.  I think I’ll get a chance to mark my HSTs today, but at least I have all my pairs set up.

In pairing my fabrics I was a little leery of some of my fabric choices but ultimately decided to go with my gut and keep my fabrics in there. Also, if I changed my mind that meant I had to do more cutting and NUH-UH. Not doing it. So I go with the feeling that “well, it’s only a Christmas quilt, so if it’s truly hideous we only have to look at it for a month!” I suppose I could also give it a real kick-ass back if we want to turn it over instead. :)

And side note, if you follow my Stash Reports, you know I’ve been steadily using up my stash. Lest you think I’ll run out of fabric, let me show you this.

It used to be that all three shelves were full and I couldn’t fit those green boxes on there.  I’m excited to have it at this level because it means that those green project boxes are off the corner of my cutting table, and onto the shelves so I have more room to spread out on the cutting table.  This picture does not include my novelty drawer, holiday fabric, or batiks.  Each of those live in a plastic drawer unit next to this shelf.  On the whole, I’m glad I’ve reduced my hunter greens down to half a stack, but feel like I need a little more aqua and “regular” browns (which I’ll need for my parents’ quilt next year anyway), and some more yellows and regular reds. However, I don’t know if I don’t use those colors because I don’t have them, or if I don’t have those colors because I don’t use them.  It’s a real chicken and egg question!

WIP Wednesday at Freshly Pieced

Star Surround Progress

Once the magical package delivery man arrived with the remainder of my background fabric (Kona Sand) (which I accidentally over-ordered and now have 3 1/2 yards to spare) (oh well!), I was able to finish cutting all my bits and pieces for the Star Surround quilt.

To recap, I’m doing a 4×5 block layout of 16″ blocks.

I have around 3 different variations of this photo; Nina’s was the least obtrusive, Morelli’s has him draped over the cut colored squares, and Jett’s has him knocking over the stacks of the background fabrics.  They have since been safely tucked away into a project box to avoid further cat hair contamination. Honestly, that’s sort of a losing battle since all three cats go in the for wake-up call when it’s time to wake up my daughter, on whose bed this quilt will ultimately reside.

In other sneaky peek news, I finished the top for Easy Street Redux.  Here’s a preview to see how I did borders on it to make it king sized. The extra HST border is on the two sides to give it a little more drop on the sides of the quilt, to protect our precious piddies when they hang over the sides from certain aforementioned cats.

Q2 Finish Along Final Tally

Well, in by the skin of my teeth on one of the projects!  My daughter’s Aeroplane bag was the last finish for the quarter on my original goal list, so here are all four of my projects, all completed and pretty. Yay!

Signature Quilt for my daughter’s teacher (done, and she loved it)

Aeroplane bag for my daughter (done, and she loved it)


 My Aeroplane bag (done, and I love it)

Labyrinth Quilt for my son (done, and he loves it)

I’ve got a rough idea of some aggressive goals for Q3. Yikes!

Q2 Finish Along Goals

One of the problems with working through projects until completion is that I don’t have a lot of UFOs. And I use the word “problem” lightly since that’s a good problem to have, in my opinion.  But I’ve scraped together some things to finish up for Q2.

Signature Quilt for my daughter’s teacher

I should be getting the blocks back from the teacher that’s helping me get the signatures this week so I can get it put together before the end of the school year in May.

Aeroplane bag for my daughter

It’s the pink one. I’ve got the parts cut and fused, and just lack the zipper.

My Aeroplane bag

It’s the orange/grey one. I need to quilt the patchwork panels and get the lining prepped, and also lack a zipper for this one as well.

Also, most pictures I take of Fred looking at the camera have him making this “I’m about to cry” face. My daughter went through a similar phase when she was two; perhaps he’ll outgrow it too?

Labyrinth Quilt for my son

I started cutting, but have just been dragging my feet on this one.  I think it’s because there are a lot of weird size cuts in it. That and there are so many other fun projects to work on, too!

she can quilt

Q1 Finish Along Wrap Up

I am excited that I finished all my Q1 goals!

I’m happy that I worked through all the cat nap mats and got them to Good Mews - when all of them sell at $15, that’ll be almost $200 for vet bills and cat litter. Huzzah!

Now to start noodling on what my finishes for Q2 should be.

2013 Quilty Resolutions

Although I am entering into Sandy’s Resolution contest over on her site, I wanted to expand a bit on the ideas she’s asking about over here.  I’ll talk about these on the next episode, which will be a bit of a “year in review” episode.

Looking Back at 2012

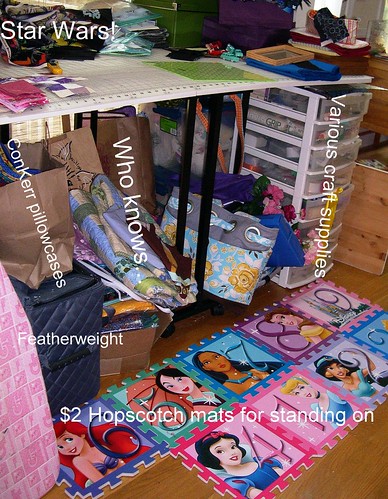
The things I am happiest about doing in my sewing this year are organizing my scraps into usable sizes, learning a good applique technique, and making some good looking king-size quilts.  Without the applique technique, I never could have made the Star Wars quilts like I wanted.


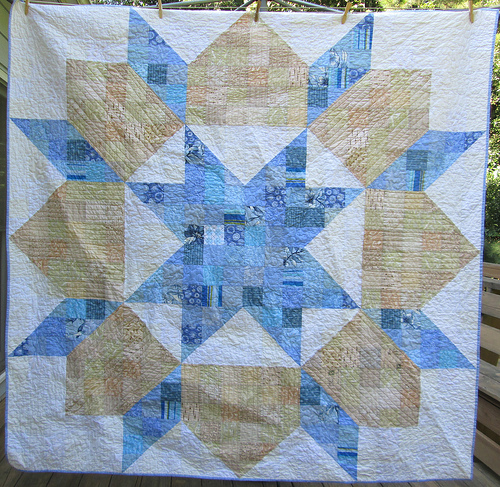
The king sized quilts mean that I get to sleep under a quilt I made, FINALLY. I’m looking forward to making a king-size Christmas quilt next year. Well, two, honestly- one for me, and one for my in-laws.


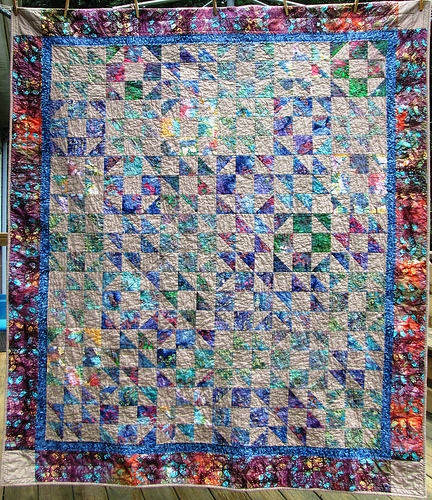
And without that scrap organization (and subsequent leaders and enders), I wouldn’t have made nearly as many quilts for Project Linus as I did.  I believe my final tally is 8 quilts for Project Linus (baby size), and 3 for Good Mews (lap size or larger).

Looking Forward to 2013

In 2012 I spent of lot of time focused on numbers. Number of quilts made, yardage used, etc.  This part of my personality isn’t going to change all that much, despite whatever I might want to decree about “taking things slow” and “enjoying the process”. I’m built to accomplish and finish things, and it’s true what they say in business school: you manage what you measure. However, I do want to feel like I’m enjoying what I’m working on most of the time, so I’m going to try to shift my philosophy a bit.

What I Want to Accomplish

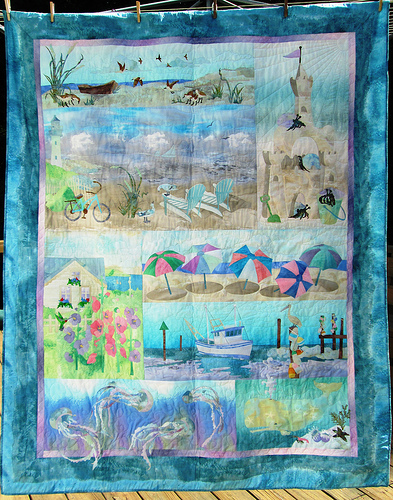
  1. My McKenna Ryan Beachwalk Quilt. I bought the kit for this over a year ago and haven’t touched it since. I’d like to make the quilt by the time we go to the beach in May.
  2. Launch my pattern business. I’m doing this with a partner, and we really just need to get off our duffs to make this happen.
  3. Christmas quilts for my daughter, me, and my in-laws. Technically this is three things all on its own, but since they are all Christmas quilts, I’m lumping them together.

What I Want to Learn

I pretty well know how to do most things I want to do in my quilting right now, so I want to learn to be a better teacher. I am HORRIBLE at teaching other people, because I feel like if I just show you how to do it, you should be able to and if you don’t clearly there is something wrong with you because it couldn’t possibly be my fault. You can imagine how awesome this approach to teaching is for my kids. So, since my daughter is getting a sewing machine for Christmas (from my parents - spoiler alert!), I figure I should get better at this. And it will help my podcast and benefit my guild, too.

What I Want to Experience Through Quilting

Delight. I felt so many times this year that I wasn’t necessarily enjoying the process of making quilts as I was joyfully entering numbers in a spreadsheet. I want to be de-goddamn-lighted by what I’m sewing. Granted, if I have to repair a pair of pants, I can’t imagine how delightful that will be, but I want to avoid the trap of feeling like I have to beat this year’s numbers.  I don’t have to, and in fact my only yardage goal for 2013 is to be net negative in usage so I have more going out than coming in.

My Guiding Word

Delightful

The New Cutting Table

State of the Stash - Avert your eyes… or “Why the jealous 13 year old boys could suck it when I won the Excellence Award in 8th grade for Shop class”. I’d like to point out I won the Excellence Award for Home Ec the same year. Thus is the dichotomy of my existence.

Anyway, here is what this area used to look like. In case you haven’t figured it out, this is going to be picture heavy.


New Cutting Table - 1

And here is my new cutting table. It’s 4 feet by 8 feet total. The primary base is two cabinet units from Home Depot when they had a half off sale. The 3-drawer unit is the “junk drawer” on top (calculator, paper, etc), batting scraps in the middle drawer, and apparel fabric in the bottom drawer. On the end is peg board with my small rulers, pinking shears, and my bottle of Best Press. Just above the pegboard is a tray for my applique pressing sheet and applique shears (a picture frame ledge from IKEA). My small drawer unit rolls under the countertop behind the base drawer unit.

When you roll the rolling drawer unit out of the way, you see where I store my Featherweight tote. Peel the onion back another layer and move the tote, you can see the long storage for batting rolls on top, and finished quilt storage on the bottom.

New Cutting Table - 2 New Cutting Table - 3

New Cutting Table - 4On top of the table, the purple slab at the end is my pressing surface. Going a slight bit to the right, here’s the view. My ruler storage holds my most frequently used rulers. My Daylight tabletop lamp (with magnifying glass for my old lady eyes, apparently). That basket is for scraps I need to cut into my standard sizes. Although you can’t see it, there’s a nice empty spot above my cutting mat to the right of the scrap basket, right in front of the window that will be a perfect Helper Cat perch. I need to make a nap mat to go there, I think. Knowing Helper Cats, though, I imagine they would sprawl willy-nilly and not stick to the designated spot.

New Cutting Table - 5On the other end of the cutting surface, I’ve got more pegboard storage. This is for my large rulers (20 1/2″ square and Shape Cut), my few quilting templates, and the t-square from my brief time as an architecture major in college. I changed my major to engineering before my first day of college. Here you can also see the bestest part ever: cupholders!

On the far left is a cupholder for tools, one for actual cups in the middle, and a cupholder I cut the bottom off of to make a receptacle for trimmings that will get put into pet beds.  If you look at the picture above, you’ll see a purple bin hanging from the table top.

New Cutting Table - 6

New Cutting Table - 7I can’t get a good picture of the cabinet doors with current lighting, so this picture is from before I attached them to the cabinets.  I added a little sewing touch each door by creating a fabric insert for each door from a different FQ from my Mama Said Sew! assortment.  I think I’ll use the other FQs to make other accessories for the sewing room, including the nap mat for the top of the table. So…. who wants to come over and play?

Scrap Organization: Complete!

I am ridiculously excited to have finished this project! As a reminder, here is the before picture of my scrap cabinet:
And here is the after…
  
… which doesn’t look like all that much from here. But! Each of those white things is a drawer to organizer various sizes of scraps.
Shelf 1 (at the top), with 10″ squares, 2″ squares (my primary leaders and enders, and why the neutral 2″ box is empty), and some miscellaneous trims:
 
Shelf 2, with 2 1/2″ strips and some of the 3 1/2″ squares:
 
Shelf 3 with 5″ and 3 1/2″ squares:
 
And Shelf 4 with a pantload of strings:
 
To make the various drawers, I made this type of basket (only without the center seam - my fabric cut outs look like giant plus signs). The fabric to make the baskets I had in my stash and was just languishing (and is from 1992, so it likely wouldn’t go into a quilt because it’s just not really my style). The dividers are “stuffed” with Peltex and stitched into the basket sides. The Peltex makes them a bit flexible which is good for a little bit of movement, but can also make them look a bit sloppy. I don’t care because they are awesome. The sides of the baskets have either mat board (that you would use in framing pictures, and is fairly cheaper by the sheet at Hobby Lobby) or corrugated cardboard.  The bottom of each basket has a piece of mat board to hold it firm. I might sew some small stitches to secure the cardboard in the sides in place, but haven’t decided yet.
Things I learned in this process:
  1. I have a lot more scraps than I thought. And I’m not done cutting - I still have darks, neutrals, and the warms to sort through.
  2. Clearly I need to do a string project sometime soon. I think it might be something like this one.
  3. I’d like it if I had more room to break out the colors further than warm/cool in some of the sizes but I had to work with the space I have.
  4. Throwing the pieces into these warm/cool piles is making me more amenable to scrappy projects, so it is working on my color sense. The real test will be when I finally make something with all these!